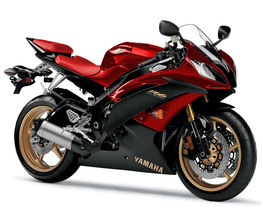
With summer on its way and school almost being over I finally decided to start on my Yamaha R6 project. I've got a '08 R6 that is currently in black and everything else on it is bone stock. Over the winter I've been buying parts and getting ready for the build. The picture is of a rendering my friend did for me with the colors that I want on the bike. From my previous experience, its much better to see the color scheme ahead of time on an actual picture rather than trying to imagine it. The picture that was used for the rendering is close enough to my bike where I can get a really good idea of how it is going to look. There only differences are: the licence plate mount, front turn signals, and the exhaust.
I just purchased the paint for the lower portion of the fairings today. I decided to go with HotRod Black from SEM since it has the matte finish that I'm after. I got a quart of paint together with the reducer and hardener in a kit for a little under a $100. As for the red I might have to change it to a red candy instead of the "mirror" look that is in the picture simply because of the price. The materials to get that finish are about $600 which is a bit more than I'd like to pay for something like that. I'm still trying to find a way to do it cheaper but there is no reason to hold off on the rest of the bike. For the rims I decided to go with powder coat due to its high wear resistance. The powder should be coming in soon so I will be doing a tutorial on how to powder coat at home. Same goes for everything else on the bike, I want to document the whole build with instructions in case you want to customize your bike as well.
I just purchased the paint for the lower portion of the fairings today. I decided to go with HotRod Black from SEM since it has the matte finish that I'm after. I got a quart of paint together with the reducer and hardener in a kit for a little under a $100. As for the red I might have to change it to a red candy instead of the "mirror" look that is in the picture simply because of the price. The materials to get that finish are about $600 which is a bit more than I'd like to pay for something like that. I'm still trying to find a way to do it cheaper but there is no reason to hold off on the rest of the bike. For the rims I decided to go with powder coat due to its high wear resistance. The powder should be coming in soon so I will be doing a tutorial on how to powder coat at home. Same goes for everything else on the bike, I want to document the whole build with instructions in case you want to customize your bike as well.
 RSS Feed